Midjourney advanced prompts are defined as prompts that involve the use of options like Remix, Vary Region, Panning, Permutations, Zoom Out, and Image Prompts. These are all advanced options that enable you to greatly influence generated images.
I've already written a few articles where I discussed some of these advanced options individually. Today, I'm going to give you a complete guide on how to use Midjourney advanced prompts.
Each advanced option in Midjourney serves a specific purpose. For instance, the panning feature enables you to extend an image in any direction. The Vary Region option enables you to edit parts of an image.
After reading this article, you will be able to take your prompting skills to the next level.
List of Midjourney Advanced Prompts
At the time of writing this article, there are 7 advanced prompt options in Midjourney. Here is a full list of the Midjourney advanced prompts:
- Image prompts
- Permutation prompts
- Multi prompts
- Remix mode
- Panning feature
- Zoom out feature
- Inpainting feature
I'm going to cover each advanced option in depth and hopefully teach you how to effectively use every single one of them by the end of the article.
Midjourney Image Prompts
Image prompts represent the first Midjourney advanced feature I used. It's relatively simple to use, but there are a few things that you should keep in mind, such as:
The longer the text portion in your image prompt, the less it will be connected to the original image. Apart from that, remember that the soft cap in Midjourney is set at 60 words, which is an additional reason why you should keep your prompts concise.
You can't change only one element of an image with this type of prompt. For instance, you can't change the color of the sky in a landscape image without also affecting other parts of an image.
When you use images in prompts, the files you use should end in .png, .gif, .webp, .jpg, or .jpeg extensions.
Now that we've covered the basics of Midjourney image prompts, it's time to talk about how to use this advanced feature.
How to Use Midjourney Image Prompts
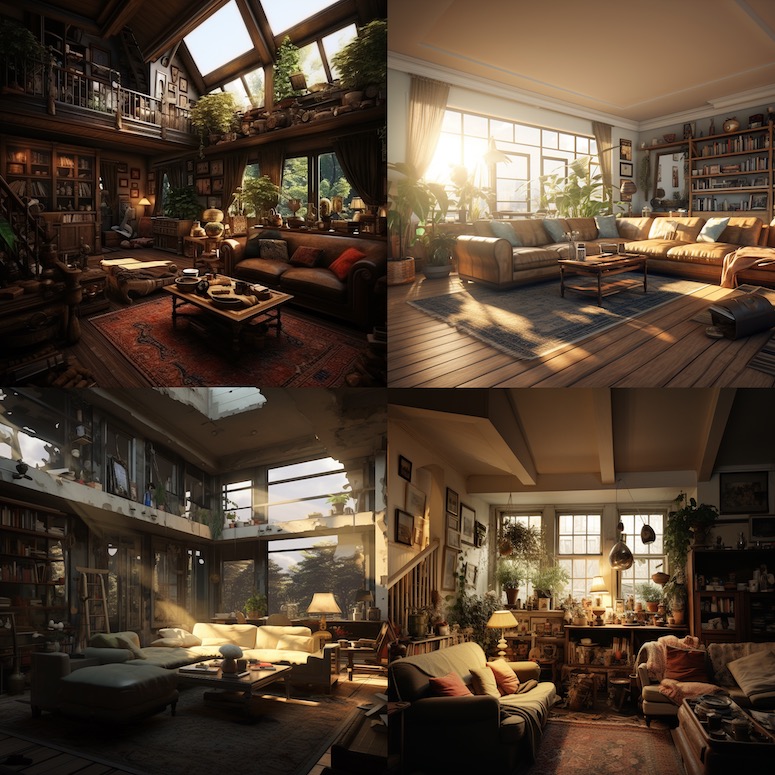
The first thing you'll need when you use this advanced option is an image. You can basically use any image you want. I personally like to use only original photos, which I have an endless supply of since my brother's main hobby is photography.
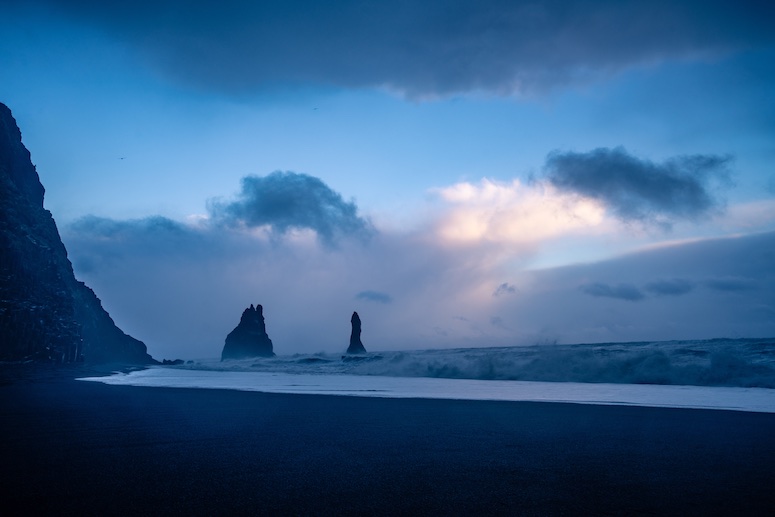
I'm going to use the photo above, which he took on a recent trip to Iceland, to show you how the image prompts option works. The first thing you'll want to do is upload the image either to the public Midjourney Discord server or your direct messages chat with the Midjourney Bot. You can do this simply by dragging the photo to the chat.
When you drag the photo over to Discord, you simply press enter and it will be uploaded. Now you can right-click on the image and press on the 'Copy Link' button. The copied link should be placed at the beginning of your prompt. In essence, this is how your image prompt should look like:
/imagine [image link], text prompt, parameters
Of course, the use of parameters is completely optional. In my image prompt that involves the use of the original photograph above, I used the following prompt:
/imagine [image link] evil lair, purple sky, ethereal aesthetic, astral aesthetic, ominous --ar 16:9
I decided to use the aspect ratio parameter because I didn't want the image dimensions to differ too much from the original photo. This is the result of my image prompt.
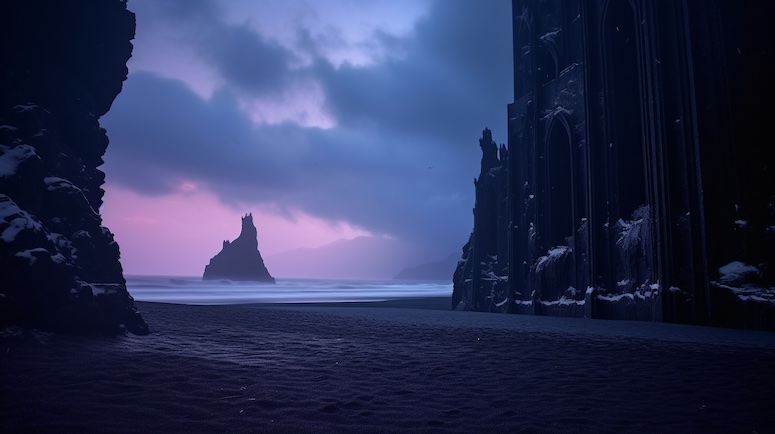
I like how it turned out. I kept the prompt simple but made sure that I greatly influenced the image style with the use of specific aesthetics tokens.
If you'd like to find additional information about image prompts or would like to see more prompt examples, I suggest that you check out my article on Midjourney prompts for existing images. It's an in-depth piece that covers this topic more than I did today because I also have to talk about other options in this article.
Midjourney Permutation Prompts
Permutations represent one of the most popular advanced options in Midjourney. Users love this feature because it enables them to write a single prompt that creates multiple image variations. I personally use this feature when I want to experiment with different prompt ideas.
What’s important to know is that the number of permutations you can do with a single prompt depends on your subscription plan. Here’s how the access to this feature is divided according to subscription tiers.
- Midjourney users with a basic subscription plan are able to create a maximum of 4 jobs with a single permutation prompt.
- If you have a standard subscription plan, you'll be able to do a maximum of 10 jobs with a single permutation prompt.
- Pro and mega subscribers can create up to 40 jobs with one permutation prompt.
When I say job, I mean it in the concept of creating one set of four images.
It's important to know that each permutation prompt variation is considered an individual job in the context of how much GPU time it consumes. That's why using permutation prompts regularly can lead you to spend way more GPU time than you normally would.
I'll show you how this feature works in the example below.
/imagine photorealistic image shot with Canon EOS R5, close up shot of a {woman, man} looking directly at the camera with a slight smile, wearing professional attire and leaning on a {white office building wall, glamorous art nouveau style wall}, ultra realistic --ar 16:9
Whenever you use the permutation prompts feature, you'll get a message asking you to confirm the process.

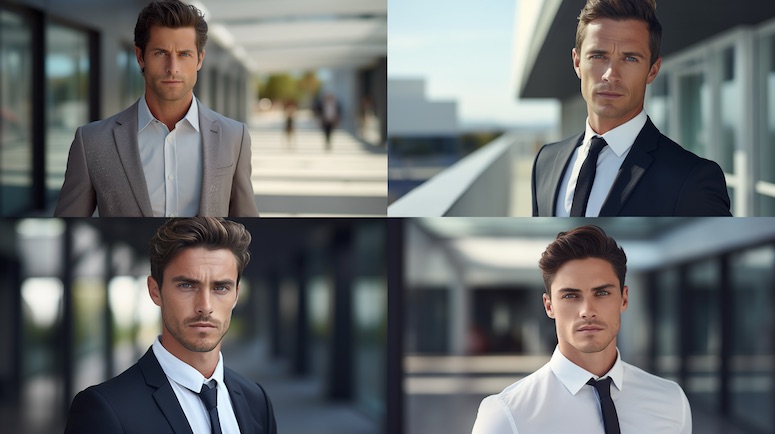
With the permutation prompt I wrote above, I was able to generate four sets of images without having to write four individual prompts. These are the individual prompts the AI model created from my permutation prompt.
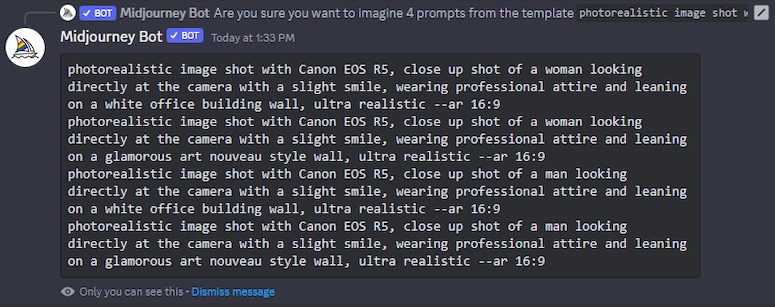
Each word or phrase that you put in curly brackets and separate with commas instructs the AI model to create an image variation using it. You can even write nested permutations, meaning that you put curly brackets with keywords inside of curly brackets that already contain certain keywords.
These are the results of my permutation prompt, divided into four different variations that were created from it.
/imagine photorealistic image shot with Canon EOS R5, close up shot of a woman looking directly at the camera with a slight smile, wearing professional attire and leaning on a white office building wall, ultra realistic --ar 16:9
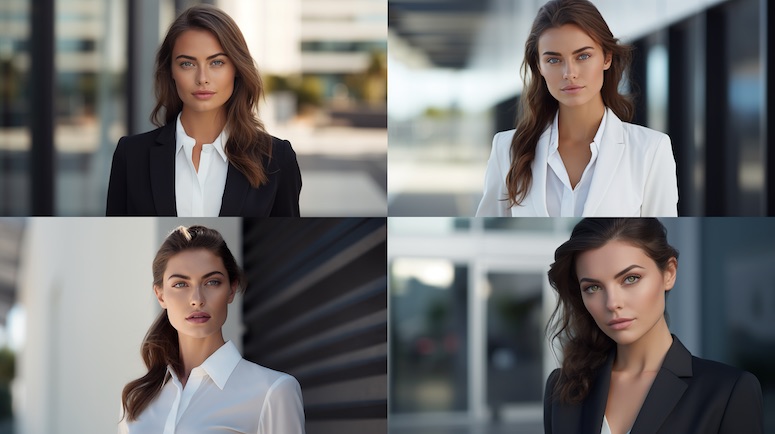
/imagine photorealistic image shot with Canon EOS R5, close up shot of a man looking directly at the camera with a slight smile, wearing professional attire and leaning on a white office building wall, ultra realistic --ar 16:9
/imagine photorealistic image shot with Canon EOS R5, close up shot of a woman looking directly at the camera with a slight smile, wearing professional attire and leaning on a glamorous art nouveau style wall, ultra realistic --ar 16:9
/imagine photorealistic image shot with Canon EOS R5, close up shot of a man looking directly at the camera with a slight smile, wearing professional attire and leaning on a glamorous art nouveau style wall, ultra realistic --ar 16:9
Permutation prompts can help you save time, but they'll also lead you to consume more GPU time. It's easy to lose track of how many images you've generated when you're using this feature. That's why you should keep track of how many GPU hours you use when you start using this feature regularly.
In case you're looking for more information on how to use this feature, I suggest you read my article on how to use permutations in Midjourney. It includes more relevant information as well as additional prompt examples.
Midjourney Multi Prompts
Multi prompts are arguably the most simple advanced feature you can use in Midjourney. It enables you to instruct the AI model to consider two or more separate concepts individually. When you want to use the multi prompts option, it's often a good idea to include open compound words in your prompt.
You can activate the multi prompts feature by adding a double colon to a prompt. I'll show you an example of how this feature works. Let's say that you wanted to create something unique while keeping your prompt incredibly short. You start with a basic idea like:
/imagine living room
As you would expect, the AI model generates photorealistic images of a living room when given this prompt. However, if I were to use the multi prompt feature and add a double colon between the two words, the generated results would be very different.
/imagine living:: room
When you use this feature, the AI model is instructed to separately consider these two concepts. In other words, the model considers this concept as a room that's come to life.
Midjourney Remix Mode
Remix mode is a powerful Midjourney feature that enables users to change prompts and add/remove parameters. The way this feature works is that it takes an initial image you generated and uses it as a starting point to generate a new image.
This is a popular option in Midjourney because it essentially gives you more creative freedom over variations. You can easily change the setting or alter the subject of an image however you see fit.
Before you start experimenting with the remix mode in Midjourney, you'll have to make sure that this feature is enabled. To do this, type /settings in your chat with the Midjourney Bot or the public Midjourney Discord server and press the 'Remix Mode' button.
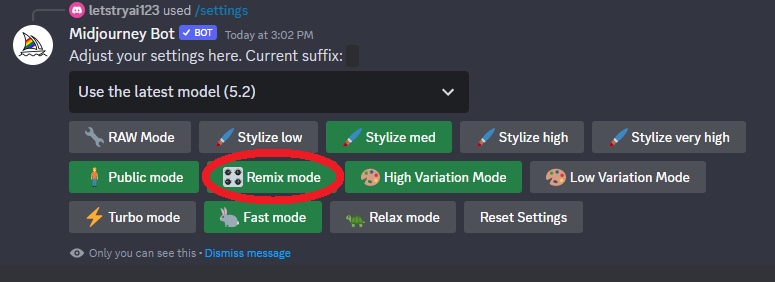
When you press on the button pictured above, you'll be able to edit your prompt during each image variation. Let's see how to use this feature effectively with a prompt example.
/imagine photorealistic image shot with Canon EOS R5, Italian pizza on a rustic wooden table, rusticcore aesthetic
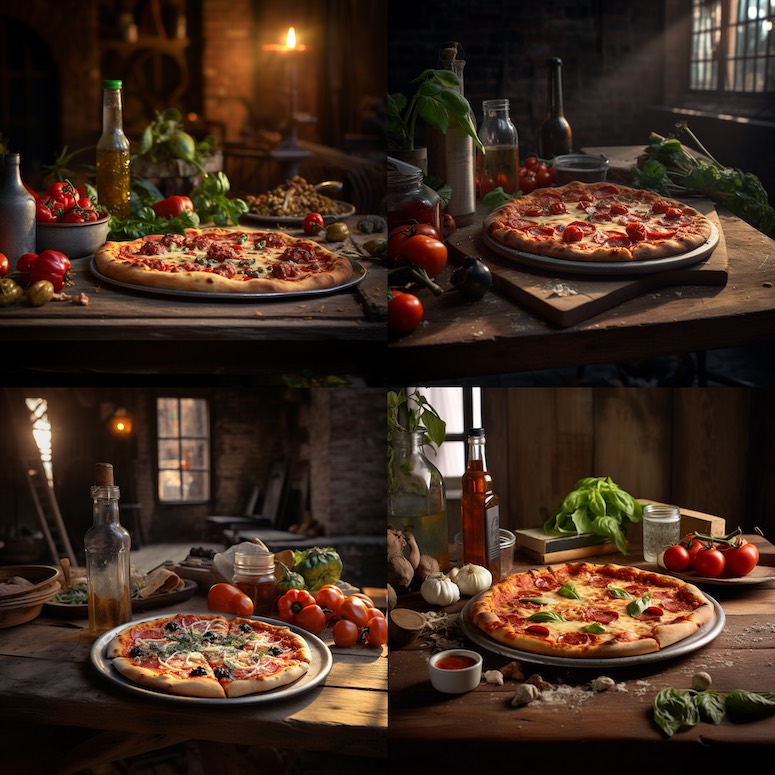
Now that I've created the initial image for this experiment, it's time to use the remix mode and see how I can alter the image. When the initial image grid consisting of four images is generated, you can choose one of the 'Variation' buttons to enter the remix mode.
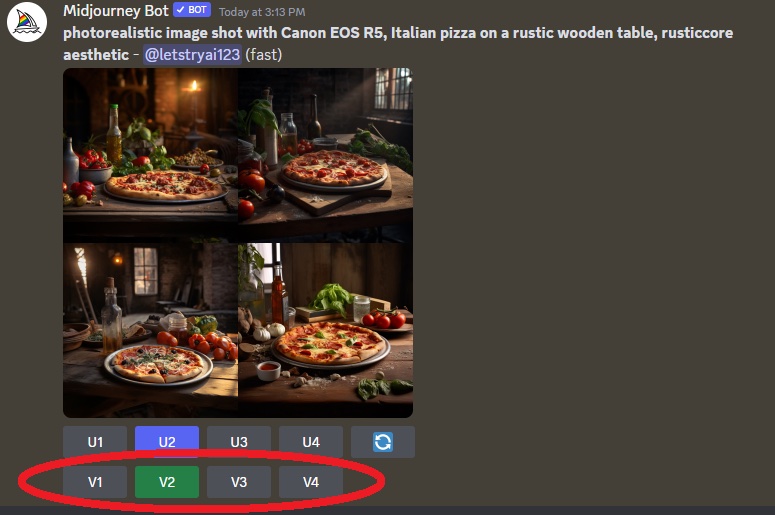
I decided that I was going to make variations to the second image in the grid because that's the one I like most. As soon as I pressed the 'V2' button, a pop-up window appeared giving me the option to make changes to my prompt.

There are numerous ways you can go about remixing a prompt. You can change the art style, add/remove elements of an image, use parameters, and so on. For this image, I wanted to change the subject from pizza to a bowl of pasta. In the remix mode window, I typed "bowl of pasta".
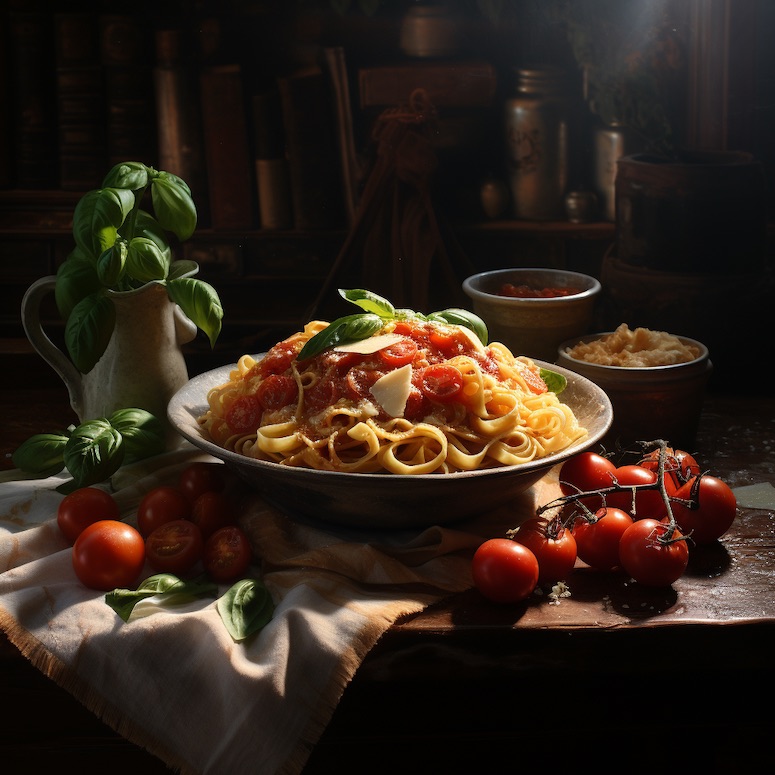
This is how the image turned out. I didn't need to mention a wooden table or specify that I want it to be a photorealistic image. All I had to do was instruct the AI model to alter the subject and it kept the same aesthetic.
Remember that the image you choose from the initial grid has a huge influence on how the variation will look. That's why you shouldn't randomly choose an image but search for the right one. If you don't like any of the four images, use the prompt again until you find the one you feel comfortable using.
Midjourney Panning Feature
The panning feature in Midjourney is one of the most fun options you can use. It essentially enables you to extend an image in any direction. In combination with the remix mode, you can also add more details to the image. It's the closest you can get to painting a picture step by step with the use of generative AI technology.
Let me show you how the Midjourney panning feature works. I'll start with a simple prompt.
/imagine peculiar landscape, otherworldly, cosmic background
As usual, the Midjourney AI model will generate a set of four images from the prompt. But to access the panning feature, you will need to upscale one of the four images.
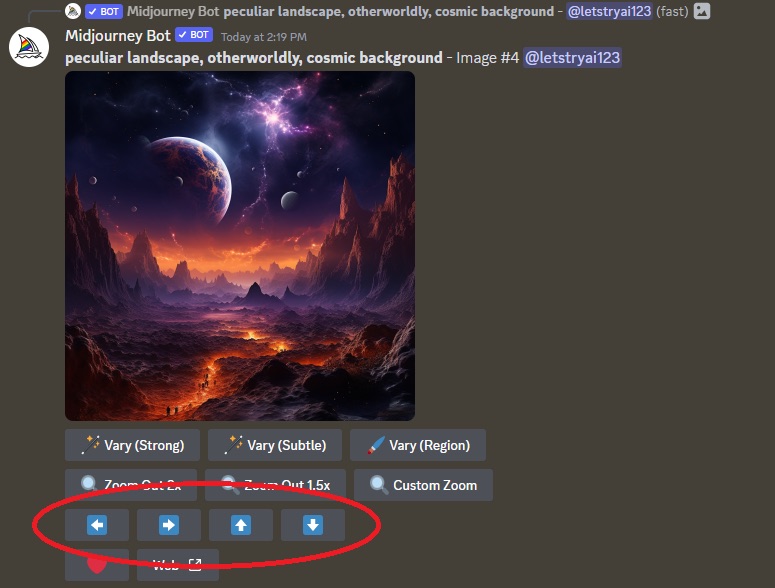
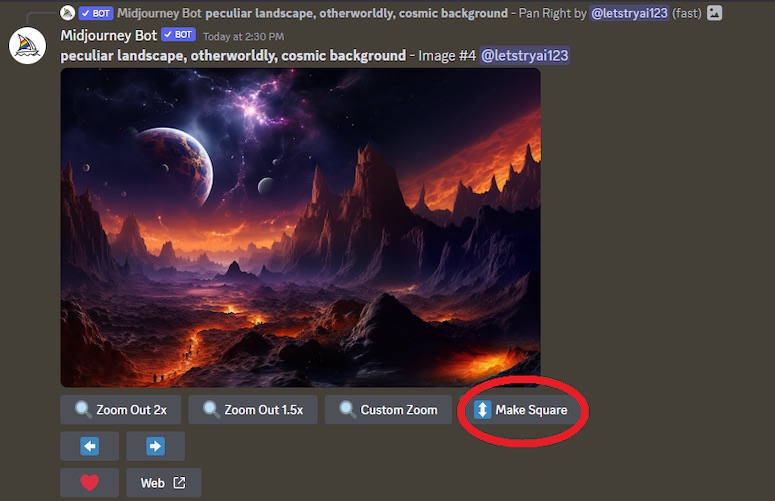
The four arrow buttons shown in the image above represent the panning feature. You can press only one button at a time. The button you press will extend the image in the selected direction. I decided to extend the original image to the right. Here's the result.
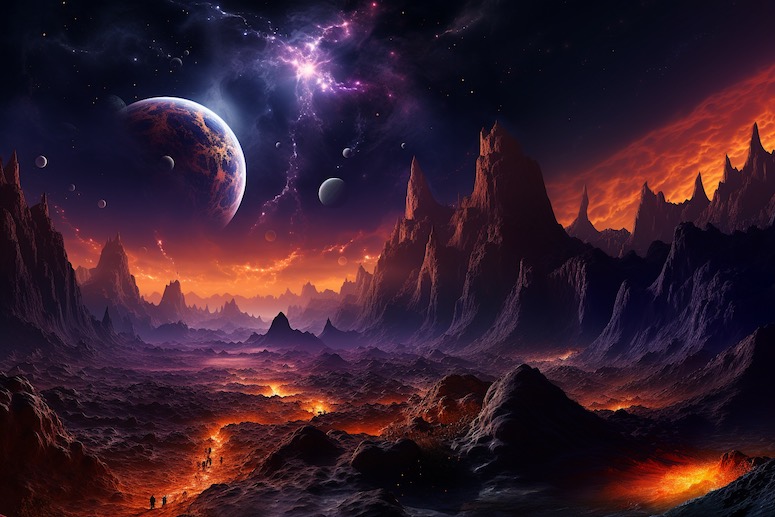
Since the AI model is expanding the canvas with the use of this feature, it will change the aspect ratio of the original image. I can once again upscale the image and expand the canvas if I want to. However, now I can only expand the canvas in either the left or right direction. To have all four directions available, I'd need to press the 'Make Square' button.
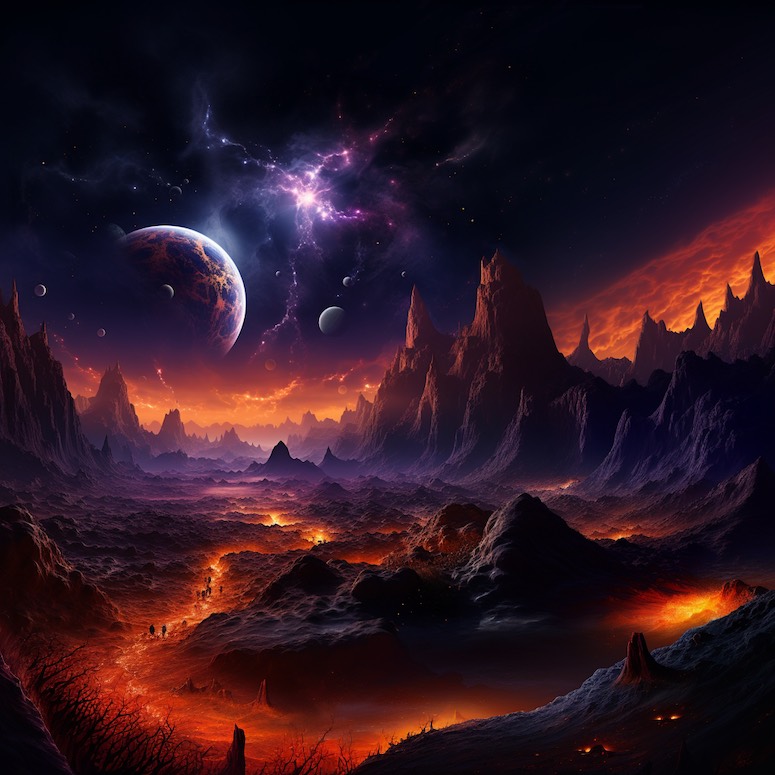
The 'Make Square' feature will revert the new image back to the default aspect ratio while filling the gaps with new elements. Here's how the image looks after I use this feature.
I can now use the 'down' arrow button to expand the canvas once again. You can basically infinitely play with this feature and see how it evolves with each additional use of the panning option.
Now that I've covered the basics of the panning feature, I'll show you how to use this advanced prompt option in combination with the remix mode to get even better results.
I'll use the same prompt as when I started explaining the panning option. I'll also repeat the upscaling process and then press the left arrow button to expand the canvas. When I do this, a pop-up window will appear enabling me to add new details to the prompt. That's the remix mode.
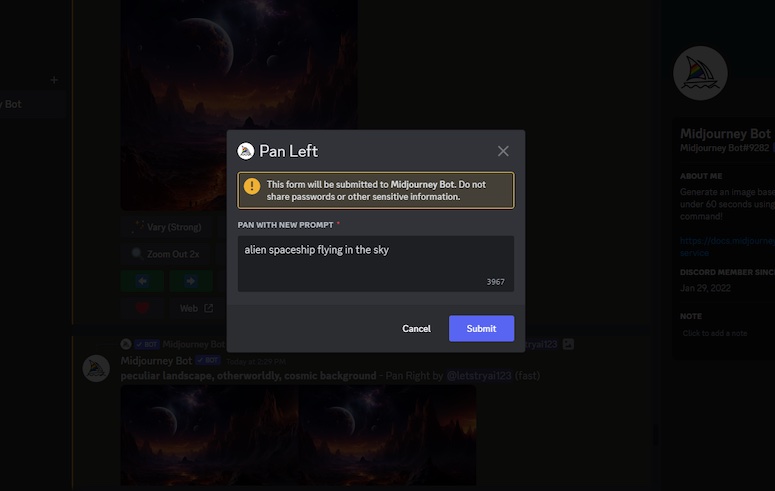
I wanted to see an alien spaceship flying in the sky in the left part of the image, so that's exactly what I typed in. Here's what the AI model generated from my prompt.

This is exactly what I was looking for. You can use the combination of the panning feature and the remix mode on a single image multiple times to create a canvas filled with incredible details.
You can check out more prompt examples related to this advanced option in my article on how to use the Midjourney panning feature. In that article, I dive deep into how this feature can be used. I especially take the time to explain how to use the feature several times on a single image.
Midjourney Zoom Out Feature
If you want to see just how powerful the Midjourney text-to-image AI model is, all you have to do is use the Zoom Out feature on an image several times and simply observe the results.
When this feature was released, I saw countless people within the Midjourney community having a blast experimenting with it. You can practically use it endlessly on a single image. Nevertheless, I have to mention that the results may become weird after the first few times you use the zoom out option on an image.
The first step to using the zoom out feature is to write a prompt and generate an image grid. The second step is to upscale one of the four images. When you do that, you'll find two buttons underneath your image displaying your zoom out options. Essentially, you have the option to choose between a 1.5X and a 2X zoom.
Let's see how the zoom out feature works using a simple example.
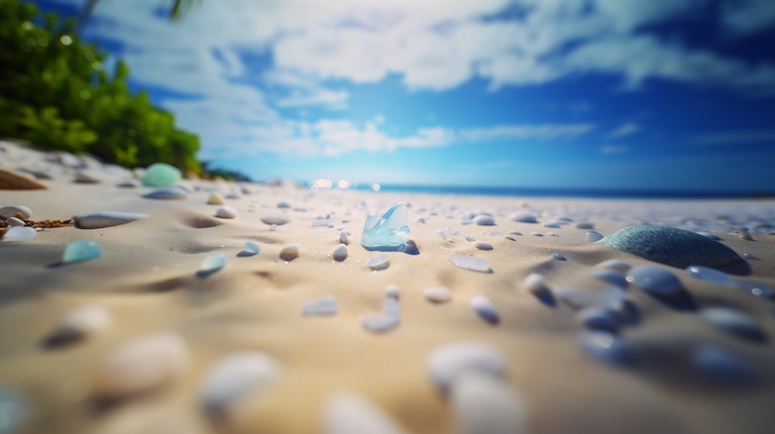
/imagine close-up shot of a small piece of sea glass in the middle of a white sand beach on a sunny day --ar 16:9
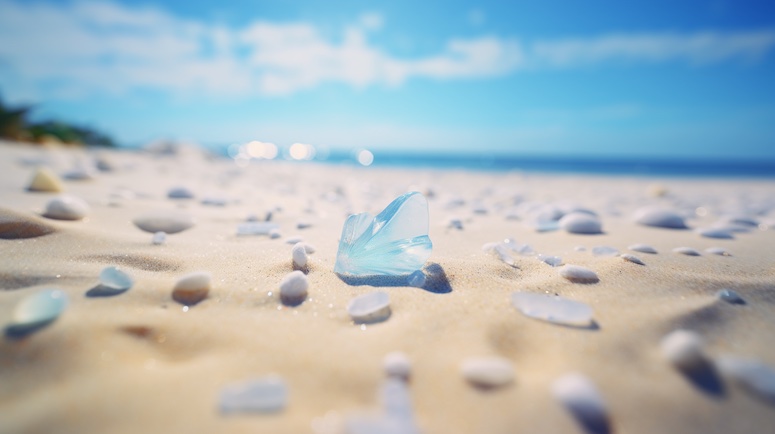
This is the prompt I came up with to show you the power of the Midjourney zoom out feature. The upscaled image is shown above. When I upscaled it, I was given the option to zoom out the image. I clicked the 'Zoom Out 2X' button, and here's the result I got.
I was interested to see what would happen to this specific image if I used the zoom out feature a few more times. I'm not going to include each iteration but instead will show you how the result turned out after I zoomed out the image three more times.
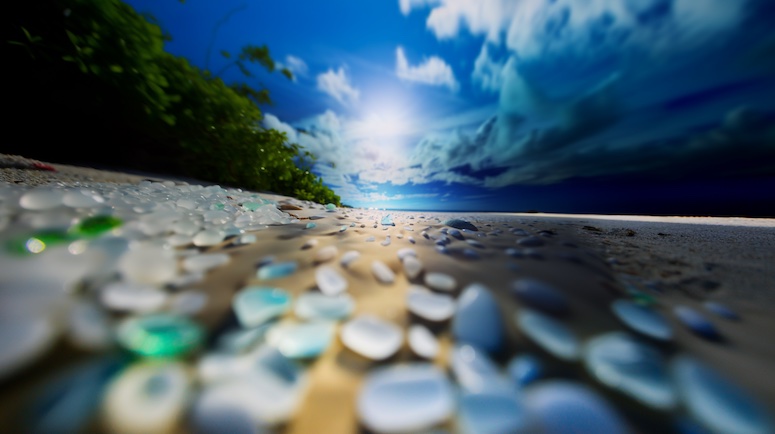
The result is incredible. While you're using the zoom out option, you get to see a step-by-step process on how the AI model can expand the canvas. Whenever you feel like something is missing from a generated image, I would advise that you use the zoom out feature and see how it will look then.
Pressing a single button in Midjourney can greatly improve the result.
In case you want to learn additional information about this advanced prompt option and see more prompt examples, I suggest you read my article on how to use the zoom out feature in Midjourney. It's a quick guide packed with all the info you'll need to know to use this feature effectively.
Midjourney Inpainting Feature (Vary Region)
Inpainting is arguably the most useful advanced prompt option in Midjourney. There might be a lot of people who don't share this opinion, but I personally find inpainting to be extremely important due to the amount of control it gives users. With the Vary Region option you can add, remove, or alter elements of an image simply by selecting a portion of the image.
The Midjourney team recommends that the inpainting feature should ideally be used when you want to select between 20% and 50% of the image. However, I've used this option a lot and it usually works great with smaller/larger regions as well.
Another thing to keep in mind is to ensure that the edits you want to do match the original generated image. Doing this will ensure that the feature works optimally.
Let's test out the Vary Region option with a simple prompt example.
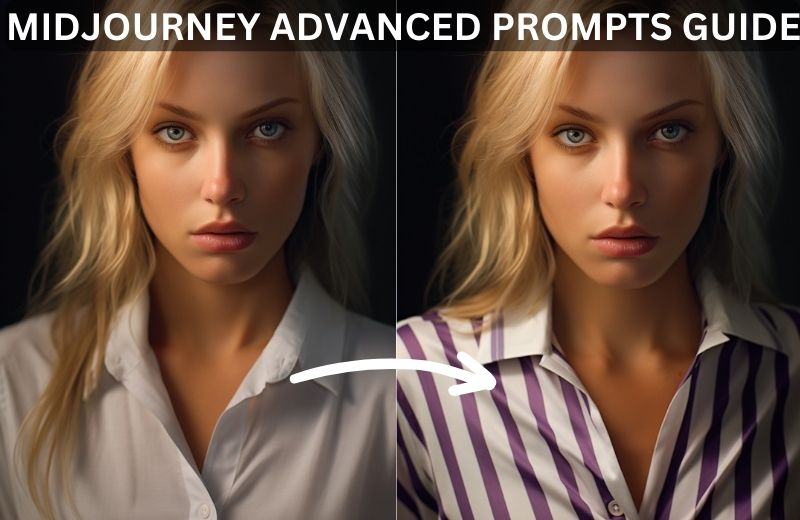
/imagine photorealistic image, close-up shot of a beautiful young blonde woman wearing a blank white shirt, looking directly into the camera, photogenic, ultra realistic --ar 3:4
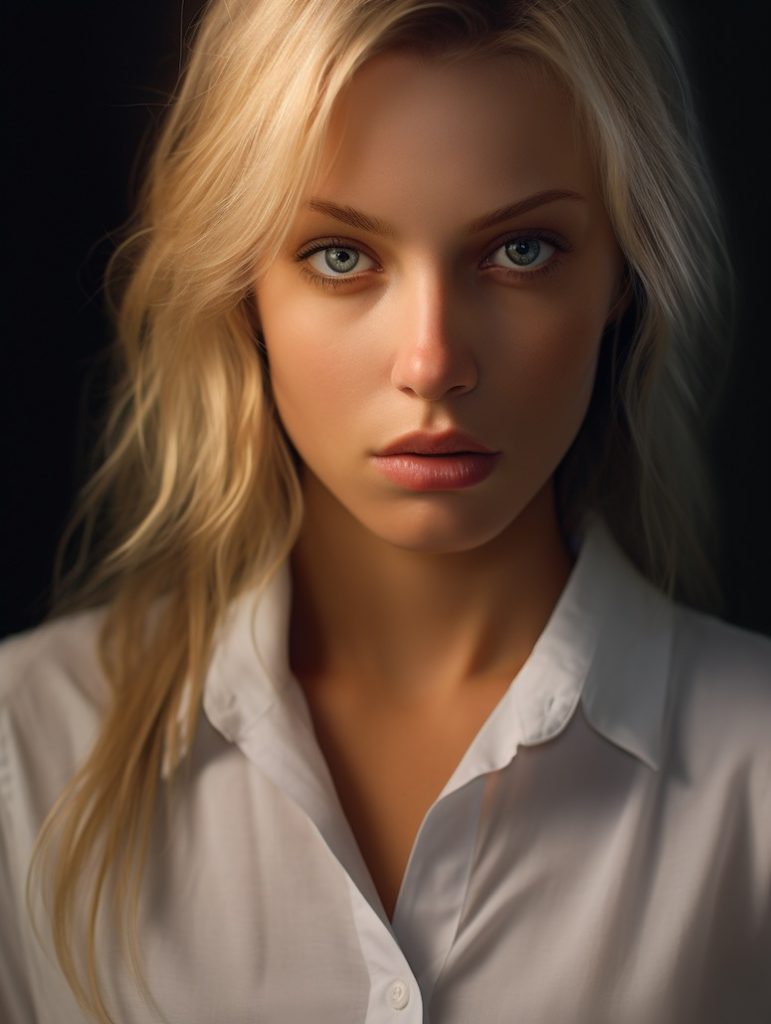
An image like this is a great way to show you the power of the Midjourney inpainting feature. Here's what you have to do to make changes to a portion of the image.
Start by upscaling the image you like the most from the initial grid. As soon as the upscaling process is complete, you'll see a button underneath the image called 'Vary (Region)'. Click on the button and a pop-up window will appear.
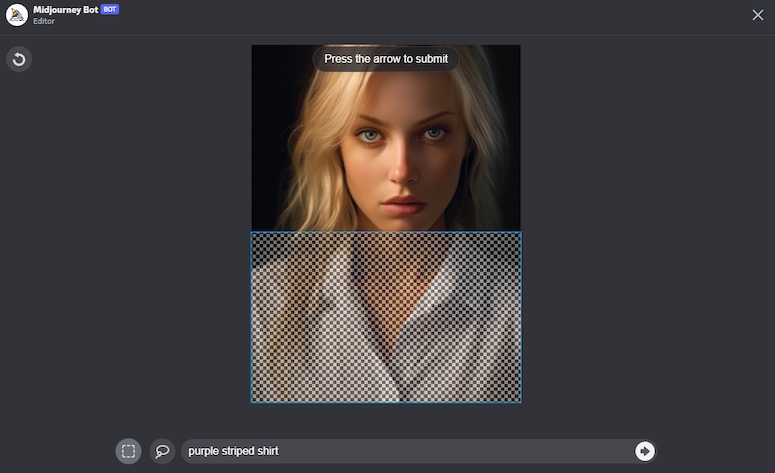
You can now select the portion of the image that you want to change. I decided that I didn't want the woman in the image to wear a blank white shirt. Instead, I felt like it would be better if she wore a purple striped shirt.
I selected the portion of the image that featured the shirt and simply wrote 'purple striped shirt' and pressed enter. Here's the result I got.
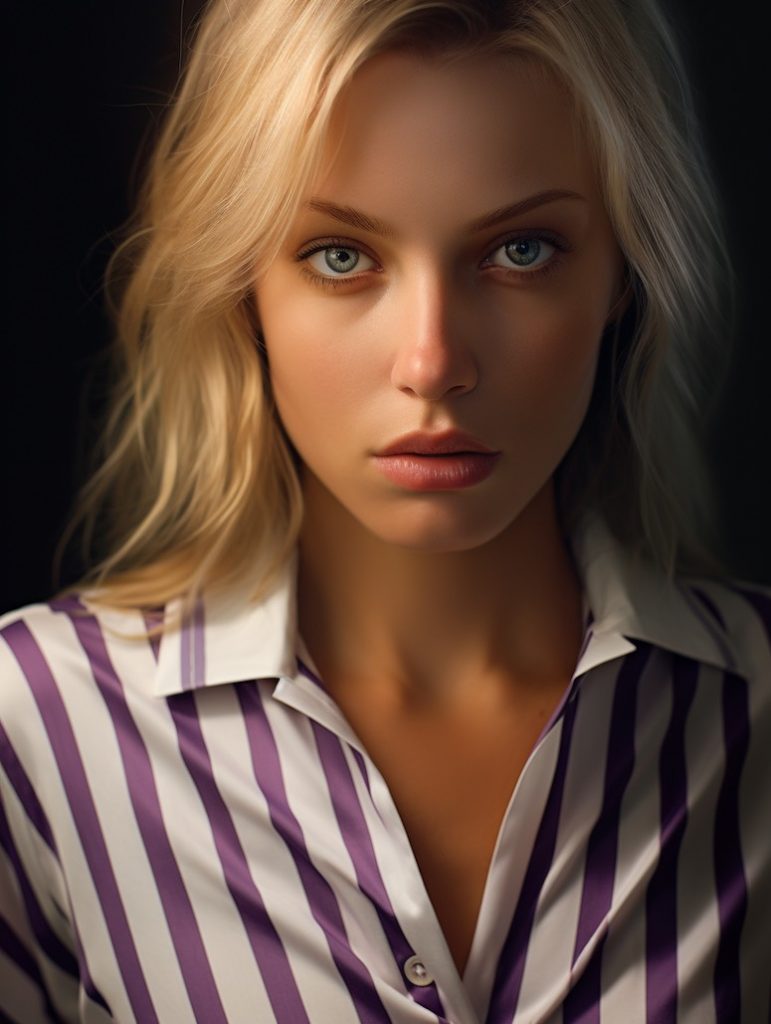
Are you not entertained? Gladiator reference aside, the inpainting feature is probably the closest thing we've got to magic at this point. It's insane that the AI model can make a change like this when given only a simple instruction and without including random objects in an image. It's truly remarkable.
The example above gives you only a limited view of what’s possible when you use the Vary Region option. You can change entire landscapes, combine art styles, remove objects, and do so much more with this advanced prompt option.
If you've read the whole article up to this point, it may not come as a surprise that I also have an in-depth guide on using the Midjourney inpainting feature. It's a great article that will provide you with even more ideas on how to use the Vary Region option in Midjourney.
Final Thoughts
The advanced options in Midjourney are quite powerful and give you significantly more control over image generations. It's relatively easy to learn how to use each advanced prompt, but it takes time to develop the intuitive skills to know when to use each option.
In my opinion, Midjourney users should first become comfortable with writing standard text prompts before they begin using advanced options. When you become good at writing standard prompts, it will make it easier for you to use the advanced features effectively.
The advanced options I use the most are the panning feature, inpainting feature, and permutation prompts. However, I think that each option is really important and should be a part of your prompting routine.